

Arduino-Based Calculator
Project:
The Arduino-Based Calculator is a customizable computation device built on the Arduino platform. Combining standard arithmetic operations with potential for unique features, it offers users an efficient, user-friendly interface bridging everyday tools with Arduino's versatility. Here's a brief overview of the steps involved:
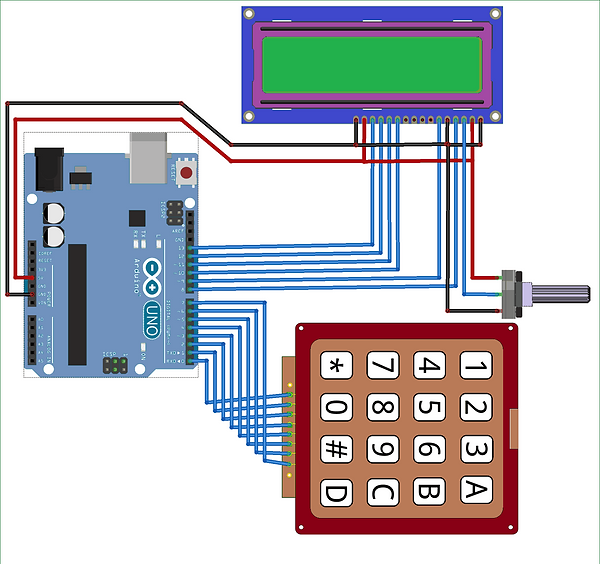
D0 to D7 are connected to the first eight pins of the keyboard.
D8 is connected to the fourth pin of the LCD, which is the register select pin.
D9 is connected to the sixth pin of the LCD, which is the enable pin.
D10 to D13 are connected to pins 11 through 14 of the LCD as its data pins.
The +5V is linked to the second pin of the LCD.
The Ground is tied to the first, third, and fifth pins of the LCD.
Important: If you encounter upload errors on some Arduino boards, try removing any connections to pins 0 and 1 while uploading.
Parts and Materials:
Code:
#include <LiquidCrystal.h>
#include <Keypad.h>
const byte num_rows = 4;
const byte num_cols = 4;
// Define keypad layout
char keyLayout[num_rows][num_cols] = {
{'7','8','9','D'},
{'4','5','6','C'},
{'1','2','3','B'},
{'*','0','#','A'}
};
byte rowConnections[num_rows] = { 0, 1, 2, 3 };
byte colConnections[num_cols] = { 4, 5, 6, 7 };
// Initialize keypad
Keypad customKeypad = Keypad( makeKeymap(keyLayout), rowConnections, colConnections, num_rows, num_cols );
const int rs = 8, en = 9, d4 = 10, d5 = 11, d6 = 12, d7 = 13; // LCD connections
LiquidCrystal display(rs, en, d4, d5, d6, d7);
long firstNum, secondNum, resultNum;
char keyPressed, operation;
bool shouldCalculate = false;
void setup() {
display.begin(16, 2);
display.print("Custom Calculator");
display.setCursor(0, 1);
display.print("-TechSavvy");
delay(2000);
display.clear();
}
void loop() {
keyPressed = customKeypad.getKey();
if (keyPressed != NO_KEY)
processKey();
if (shouldCalculate)
computeResult();
showResult();
}
void processKey() {
display.clear();
if (keyPressed == '*') {
Serial.println("Clear pressed");
resultNum = firstNum = secondNum = 0;
shouldCalculate = false;
}
if (keyPressed >= '0' && keyPressed <= '9') {
Serial.print("Button "); Serial.println(keyPressed);
if (resultNum == 0)
resultNum = keyPressed - '0';
else
resultNum = (resultNum * 10) + (keyPressed - '0');
}
if (keyPressed == '#') {
Serial.println("Equals pressed");
secondNum = resultNum;
shouldCalculate = true;
}
if (keyPressed >= 'A' && keyPressed <= 'D') {
firstNum = resultNum;
resultNum = 0;
if (keyPressed == 'A') {
Serial.println("Add");
operation = '+';
}
if (keyPressed == 'B') {
Serial.println("Subtract");
operation = '-';
}
if (keyPressed == 'C') {
Serial.println("Multiply");
operation = '*';
}
if (keyPressed == 'D') {
Serial.println("Divide");
operation = '/';
}
delay(100);
}
}
void computeResult() {
if (operation == '+')
resultNum = firstNum + secondNum;
if (operation == '-')
resultNum = firstNum - secondNum;
if (operation == '*')
resultNum = firstNum * secondNum;
if (operation == '/')
resultNum = firstNum / secondNum;
}
void showResult() {
display.setCursor(0, 0);
display.print(firstNum); display.print(operation); display.print(secondNum);
if (shouldCalculate) {
display.print(" ="); display.print(resultNum);
}
display.setCursor(0, 1);
display.print(resultNum);
}
Explanation:
Introduction and Libraries:
#include <LiquidCrystal.h>
#include <Keypad.h>
This section introduces the purpose of the code (an Arduino-based calculator) and includes two essential libraries:
- `LiquidCrystal.h`: This library enables the code to interact with LCD displays.
- `Keypad.h`: This library provides functions to interact with keypads.
Constants and Global Variables:
const byte num_rows = 4;
const byte num_cols = 4;
// Define keypad layout
...
byte rowConnections[num_rows] = { 0, 1, 2, 3 };
byte colConnections[num_cols] = { 4, 5, 6, 7 };
// Initialize keypad
...
const int rs = 8, en = 9, d4 = 10, d5 = 11, d6 = 12, d7 = 13; // LCD connections
...
long firstNum, secondNum, resultNum;
char keyPressed, operation;
bool shouldCalculate = false;
This section defines:
- The number of rows and columns of the keypad.
- The layout of keys on the keypad.
- The Arduino pins connected to the keypad rows and columns.
- The pins used for the LCD.
- Variables to store numbers being calculated, the operation, and the final result. The boolean `shouldCalculate` indicates when to perform the calculation.
Setup Function:
void setup() {
...
}
This function runs once when the program starts. It initializes the LCD and displays a welcome message.
Main Loop:
void loop() {
keyPressed = customKeypad.getKey();
if (keyPressed != NO_KEY)
processKey();
if (shouldCalculate)
computeResult();
showResult();
}
This is the main loop that constantly runs. It checks for any keypress, processes the pressed key, calculates the result if needed, and then displays the result.
Key Processing:
void processKey() {
...
}
This function handles the logic for when each key is pressed. Depending on the key pressed, it sets values to variables, triggers operations, or prepares for a calculation.
Result Computation:
void computeResult() {
...
}
Based on the operation chosen (+, -, *, /), this function calculates and stores the result.
Displaying the Result:
void showResult() {
...
}
This function displays the operation and the result on the LCD.
This program provides a basic calculator functionality where the user can press keys on a keypad to input numbers and operations, and then see the result on an LCD.
Circuit Design:
